الأربعاء، 22 مايو 2013

The Process of Articulation Therapy ...


 The Process of Articulation Therapy:

For those of you that have read some of my previous posts on how to teach specific sounds you may have noticed a pattern. That’s because when teaching kids how to say sounds there IS a general pattern I follow even though each specific sound changes. I wanted to outline this for you because if you understand this pattern, it will make teaching the sounds so much easier!
Before I get into the details of this process, please understand that there are many other factors that affect speech intelligibility such as hearing loss, apraxia, oral motor deficits, sensory issues, and phonological processes to name a few, but I will not be addressing any of these here. This post is intended to simply explain the basic structure of articulation therapy and how you can work with your child on their sounds.
So, let’s get started! The very first thing I want to know as a Speech Language Pathologist is what sounds does the child have difficulty with. As a parent you could probably list them without a problem. If you do need some help you may want to see a speech pathologist and they can help you identify them. They can do an articulation assessment that will tell you exactly what sounds your child is struggling with, what position of the word (begining, middle or ending) they are struggling with it in, and what sound if any they are substituting it with. They can also tell how your child compares to other children their age. So, after I have outlined the problem sounds I like to check for stimulability.
Stimulability
What is stimulability? A child is “stimulable” if he or she can say the sound in direct imitation of the therapist or parent. If the child is stimulable or can say the sound then you have cause to celebrate. That means your job is going to be so much easier! If the child cannot say the sound, you’ll have some work to do. You’ll need to teach them how to say the sound. This is called sound elicitation.
Sound Elicitation
Sound elicitation is the process you go through to teach the child how to say the targeted sound. For example, if a child cannot say the /th/ sound in imitation you break down the process for them. You might say, “Put your tongue between your teeth then blow.” After the sound is learned, meaning they can say it accurately in imitation of you then practice the sound in isolation.

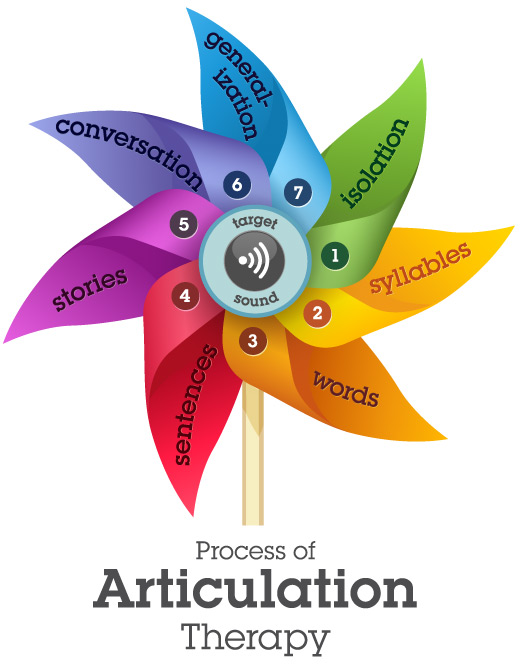
Sound in Isolation
Practicing a sound in isolation means saying the sound all by itself without adding a vowel. For example, if you are practicing the /t/ sound you would practice saying /t/, /t/, /t/ multiple times in a row. The more accurate repetitions you are able to get your child to produce the better. I am satisfied with 10 accurate repetitions in a row. When you are satisfied they can say the sound in isolation you are ready to move on to syllables.

Sound in Syllables
Practicing a sound in syllables simply means adding each vowel after the target sound, before the target sound, and before and after the target sound, being sure to practice the long and short form of each vowel.
For example if the target sound was /s/ “after the target sound” would be “sa, se, si, so, and su.” This is called “initial syllable production”, meaning the target sound is in the beginning of the syllable.
If the target sound was /p/ then placing the vowel “before the target sound” would be “ap, ep, ip, op, and up. This is called “final syllable production”, meaning the target sound is at the end of the syllable.
If the target sound is /k/ then placing the vowel “before and after the target sound” would be, “ako, eki, ika, oku, and ukee. Of course there are multiple variations. This is called “medial syllable production”, meaning the target sound is in the middle of the syllable.
When I introduce the syllables I like to see in which position the child has the easiest time producing the target sound. If the child is the most successful with the target sound in the initial (beginning) position of syllables I will begin work on the target sound in initial position of words. If the child has more success with the target sound in the final position of syllables then I would begin working on the target sound in the final position of words.
So the plan here is to work on the position they are having the most success with but not a position that is currently not a problem for them. For example, a child may exhibit a typical error pattern, or phonological process of final consonant deletion. This means they leave off the ending of most of their words. While the child can say the /m/ sound in the initial position of words with no difficulty, they never say it at the end of words. In this instance it is obvious that the sound in the initial position would not be a problem for them and would not be the place to start. Instead you would most likely begin work on the final position of the word.
Once your child can say the sound in syllables you can move the sound into words.

Sound in Words
At this point you have decided which position of the word you want to target and will begin practicing word cards in the initial, medial or final position of the word. I am satisfied with 80% accurate independent productions before I move on to the next step, which is using the word in a sentence. Meaning, I don’t count it as correct if the child says it in imitation of me. If I have to model a word for a child I will often put that word card back in the rotation for them to say again. After all the cards have been said we go back and practice the word cards that were in error.
There are so many ways to make practicing word cards fun. I sometimes make a snake and put a little incentive such as an m&m or a fish cracker every 3-5 cards. I have also fed the cards to puppets after they have been said, hid them around the room and gone on a hunt to look for them, as well as played memory, go fish and other fun card games. Be creative this makes it more fun for both of you!

Sound in Sentences
My favorite way to practice sounds in sentences is with a “rotating sentence”. In a rotating sentence only the word card changes. For example, your sentence might read, “Put ________ in pink purse.” Then you rotate all your practice cards through the sentence. This is an especially great way to practice sentences for young children who can’t read yet. They are able to memorize the sentence, or use visual cues to help them read it aloud. You are also able to maximize the production of your target sound when you use a sentence with two or three target words in it. You may find my sentences for the different sounds on the worksheets page.
With older children, I have them write their own sentences using their target words. When a child has articulated 16/20 or 80% correct I have them move to stories.

Sound in Stories
Practicing the sound in stories is not a step that is typically recommended. In fact it is more common to move straight from sentences to conversation. I have found that with the addition of this step I have more success moving the sound into conversation.
For my younger children I like to prepare a story for them to practice using the sound cards they have been practicing. You may use the stories I have created on my worksheets page. I try to include as many picture clues as I can so young children can retell the story without being able to read.
I have asked older clients to write their own stories using the word cards. They usually come up with very creative stories that are very entertaining for both of us.
After the child has mastered reading the story aloud with 80% accuracy I have them retell me the story without reading it. This is just another small step toward getting an accurate production of the target sound in conversation. Once they can do this I move them to conversation.

Sound in Conversation
In the therapy setting this step can be a little more tricky. I like to use a conversation jar. I have probably 200+ questions in my conversation jar that get my clients talking and telling me all about themselves. It also gives me a more controlled environment where I can track their progress in conversation. You may also consider centering conversation topics around some of the target words they have mastered. However you decide to do it be sure to set a specified time to focus on the correct production of the target sound during conversation. Be sure to correct any inaccurate productions of the target sound at this time.

Generalization
Once the sound has been mastered in words, sentences, stories and in conversation you want to watch for generalization across all the contexts of language. If the child you are working with seems to be having difficulty generalizing the target sound go back and practice the words, sentences and stories again until they are able to produce the sound correctly in daily speech.
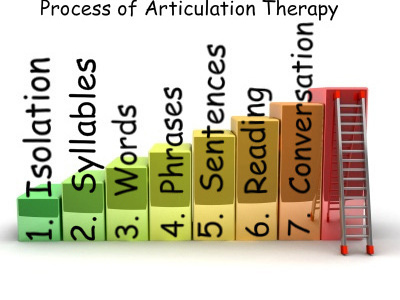
A quick review… First practice the sound in isolation, then in syllables, words, sentences, stories, conversation and finally generalizing the target sound in all contexts of language. When this pattern is followed the child has a greater likelihood of success. The only thing that changes in this process is how to elicit the different sounds. This basic pattern of how to teach the sounds remains the same.
I hope this will give you a good starting point in working with the “misarticulations” in your child’s speech. Remember to be patient, and to make it fun!

Teaching Speech Sounds: The Process of Articulation Therapy ...

Teaching Speech Sounds: The Process of Articulation Therapy

Teaching kids how to say speech sounds they can’t produce is called “Articulation Therapy.”  As a speech-language pathologist I assess what sounds need to be learned and then systematically train a child how to produce them.  It is one of the most rewarding things I do.
I love when it begins to click and I can see my clients producing their sounds correctly and confidently.
I have created several worksheets for you to use with your child or your students, but I thought that it would be helpful for me to explain the process of how to teach these sounds. There are many reasons a child might not be able to say a certain sound(s). Some of those may be related to apraxia of speech, phonological disorders, cranio-facial anomalies (i.e. cleft lip/palate), etc.  Those special cases will not be discussed right now in this post.  I will be explaining a traditional articulation therapy hierarchy.  It is a brief and basic outline you can use when teaching your child or student to produce certain sounds he/she is struggling to say.
It is always a good idea to check with your local speech-language pathologist so they can fully assess your child’s speech and language needs.  A speech therapist will usually give an Articulation Test to see which sounds are in error and in which part of the word (beginning, middle, or end).  Once this is determined, they will see if those errors are typical for kids of that age or not.  They will then recommend therapy if necessary.
Just to let you know – there are a few different ways of teaching speech sounds to kids.  I’m going to walk you through what is known as the “Traditional Articulation Therapy” approach.  Depending on the age, number of sounds in errors, and other underlying factors an SLP may choose to use a different approach – again, just another good reason to consult with your local SLP! They will be happy to help you and your child!
Okay, let’s go through each step of the traditional process of articulation therapy!

1.  ISOLATION

The first thing you want to do is see if your child can make the sound by itself.  We call this first level ‘isolation’.  See if they can copy you as you model how to say the individual sound.  Have them really listen and watch you say the sound first and then copy you.  If they can correctly imitate you – this is great! We would then say that they are stimulable for that sound, meaning they can physically produce it! (i.e. lift their tongue into the right spot in their mouth, etc.)  Now you would begin to help incorporate that good speech sound into all levels of speech!
At the isolation level, you can begin to model the correct sound production in your everyday speech with your child. Try to highlight and emphasize it whenever you say it.  Print out some of the worksheets that have their sound in them and talk about the words and the pictures with your child.  Using the conversational re-cast is another great tool!  It is so simple and effective.  If you hear your child use an incorrect sound (gag for dad) you would say something like this:
Child:  ”I want to play with gag” (dad)!
Parent:  ”Yes, you can play with DaD after lunch!”
You just re-say or re-cast the sentence your child just said, BUT you emphasize the correct sounds.  This is much better than asking your child to continually repeat their words or sentences – which can be so frustrating for kids.  By hearing you say the correct sound immediately after they have made the error, they are getting the feedback they need!
If your child cannot imitate you at all, then you would want to begin teaching them where to put their tongue in their mouth in order to say the certain sound (i.e. behind upper teeth (for /t/ or /d/ sounds) or (in the back of the throat for /k/ or /g/ sounds).

2.  SYLLABLES 

The second level in the process of articulation therapy is called the ‘syllable level’. This is when we pair the individual sound (which they should be able to produce now) with a vowel.   At this level, you would use the long and short vowel sounds along with the target sound.
Let’s say you are working on the /t/ sound.  Here is how you introduce that sound in syllables in all positions (beginning, middle, and end).   Have your child practice saying the sound at the beginning of the syllable: tay, tea, tie, toe, to.  Then at the end of the syllable:  at, et, it, ot, ut.  Then finally in the middle of the syllable:  atta, etta, itta, otto, uttu.   Once your child can say the sound at the syllable level, you can move on to words!

3.  WORDS

Now it’s time to put that sound into real words!  Start with the beginning of the word using the worksheet pages to make cards.  Then move to the end and then the middle of the word.  You can also go on a treasure hunt in your home and hunt for things that have the target sound in them!  For example, you and your child (or client if you are an SLP) can search for things containing their sound.  See how many you can find!  You could even hunt for things with their target sound at the grocery store, at the park, in books, etc!

4.  PHRASES

Now that your child has their sound down in single words, you are ready to increase the level of difficulty again by adding a few more words to the mix!  A phrase is simply using their target sound in combination with a couple words.  Let’s use the /t/ sound again as an example.  Here are some phrases with the /t/ sound:  ”Too much fun”, “Take the car”  ”time to eat” “count to three” etc.  Use words that have the target sound in the beginning, middle, and end.

5.   SENTENCES 

The sentence level just adds more words to the phrase to make a complete sentence.  This level is more difficult because it requires the child to maintain correct speech sound production while adding other words to express a complete thought!  Whew! That can be a lot for some kids to remember!  Just keep practicing! It may take lots of tries, but they will get it.   Use words that contain their sound in all positions of the word (beginning, middle, and end).  Have them practice saying their the target sound in the beginning of words in sentences: “A big _________” (insert the words: tree, toad, tiger, etc.).  Then have your child practice using their target sound at the end of words in sentences:  ”The funny ______ is under the table” (insert final /t/ words: cat, rat, boat, etc.).  Do the same for medial /t/.
It is fun when the sentences are silly! You can talk about why the sentences are silly. Ask your child why it’s silly for a boat to be under the table or what a funny boat looks like?  Have them use their imaginations!  They could draw a picture of a “funny boat” and tell you about it using their good /t/ sound.

6.  READING (Or Oral Story-Telling for non-readers)

If your child can read, you will then be able to introduce books and have them read to you while continuing to produce their target sound correctly.  If your child is not yet a reader, have them tell you stories they make up.  They can also retell a story you have told them.  I love this level because my students are professionals at telling me stories!

7.  CONVERSATION

This is the last level!  Once your child has progressed through reading/story-telling, they should be ready to use their target sounds during their everyday speech.  You can continue to re-cast their sentences if they forget to use their correct sound.  You can also remind them to use their “good __ sound!” if you hear an error.  By this time, there should only be occasional errors.  Producing their target sound should be almost effortless and very automatic.

Remember to have fun and to be patient!  This can take a lot of time, but your child will get it!  Please let me know how you are doing with this approach.  I love hearing stories about how therapy is going!

الاثنين، 29 أبريل 2013

ما هي المتطلبات التي يجب توافرها في الكوادر البشرية داخل برامج التوحد ؟


ما هي المتطلبات التي يجب توافرها في الكوادر البشرية داخل برامج التوحد ؟
المجال الأول ـ الكوادر البشرية : وهناك عدة متطلبات في هذا المجال كما يلي :
*    أن يقوم على البرنامج التربوي أشخاص من المتخصصين في التربية الخاصة على مستوى البكالوريوس على الأقل ( مسار التوحد أو الاضطرابات السلوكية والانفعالية ( وفي حالة عدم توفر هذا المؤهل فيشترط أن يكون حاصلاً على مؤهل تربوي جامعي على الأقل بالإضافة إلى دبلوم تربية خاصة ( مسار توحد أو اضطرابات سلوكية وانفعالية ) بعد البكالوريوس لا تقل مدته عن سنة دراسية .
*    مساعد معلم على أن لا يقل مؤهله عن ثانوية عامة مع دبلوم أو دورة تدريبية لا تقل عن فصل دراسي كامل في التربية الخاصة ( توحد / اضطرابات سلوكية وانفعاليه ) .
*    توفر اختصاصي الخدمات المساندة في البرنامج مثل اختصاصي التواصل والعلاج الوظيفي والعلاج الطبيعي والإرشاد النفسي والتحليل السلوكي والتشخيص والتقويم في التربية الخاصة .
*         العمل كفريق متعدد التخصصات ، مع تحمل مسئولية مشتركة .
*        تنظيم دورات تدريبية أثناء الخدمة .
*        أن يكون المشرف على برامج التوحد متخصصاً في هذا المجال .

تحيتي ومودتي ... أيمن ... ؛

ما هي طرق التعلم عند الأطفال التوحديين ؟؟


ما هي طرق التعلم عند الأطفال التوحديين ؟؟
            هذه عبارة عن ملخص لمحاضرة ألقتها د . كاثلين كيل Kathleen Quill حول طرق تعزيز التعلم عند الأطفال المصابين بالتوحد حيث بدأت بشرح أهمية فهم الطريقة التي يفكر بها هؤلاء الأطفال، ثم قامت بعرض طريقة التفكير الإدراكي والاجتماعي عند هؤلاء الأطفال، ثم شرحت الطرق التي تساعد على تعزيز التعلم من خلال استخدام الأعمال الروتينية المعتادة وأدوات التعليم المرئي .

 التفكير الإدراكي والتواصل الاجتماعي :
تقدم كتابات تمبل جراندن ، ودونا ويليامس ، وغيرها وسيلة لفهم كيف يفكر الأشخاص المصابون بالتوحد ، حيث يظهر من خلال هذه الكتابات اعتماد الأشخاص المصابين بالتوحد على طريقة من التفكير تتميز بالتالي ( في معظم الأحيان ) :
1.       التفكير بالصور وليس الكلمات .
2.      عرض الأفكار على شكل شريط فيديو في مخيلتهم ، الأمر الذي يحتاج إلى بعض الوقت لاستعادة الأفكار .
3.      صعوبة في معالجة سلسلة طويلة من المعلومات الشفهية .
4.      صعوبة الاحتفاظ بمعلومة واحدة في تفكيرهم ، أثناء محاولة معالجة معلومة أخرى .
5.       يتميزوا باستخدام قناة واحدة فقط من قنوات الإحساس في الوقت الواحد .
6.      لديهم صعوبة في تعميم الأشياء التي يدرسونها أو يعرفونها .
7.      لديهم صعوبات في عدم اتساق أو انتظام إدراكهم لبعض الأحاسيس .

وتبين المعلومات المتوفرة حول التواصل الاجتماعي لدى هؤلاء الأفراد أنه من المحتمل أن :
*        تكون لديهم صعوبات في فهم دوافع الآخرين وتصوراتهم حول المواقف الاجتماعية .
*        يواجهوا صعوبة في معالجة المعلومات الحسية التي تصل لديهم ، مما يؤدي إلى وجود عبء حسي sensory overload .
*        يستخدموا العقل بدلاً من المشاعر في عمليات التفاعل الاجتماعي .
ولذلك ، وبناء على افتراض أن التلاميذ التوحديين يكتسبوا المعلومات بطريقة مختلفة ، فإنه يجب أن يكون هنالك توافق بين أساليب التعلم عند هؤلاء التلاميذ ، وطرق عرض المواد لهم ، حيث يجب أن يبدأ المعلمون بالعمل على الاستفادة من نقاط القوة عند التلاميذ التوحديين ، وقد أكدت الدكتورة كيل على أنه من أجل خلق بيئة تعليمية مساعدة يجب على المعلمين أن يقوموا بوضع بنية ثابتة Structure أثناء التدريس .

البنيـــــة الثابتــــة   Structure

تعتبر البنية الثابتة من الأمور الحيوية عند تدريس الأطفال المصابين بالتوحد ، ويمكن تعزيز الأنشطة ببنية ثابتة تعتمد على :

1.       تنظيم المواد المطلوبة للدرس .
2.      وجود تعليمات واضحة .
3.   وجود نظام هيكلي لتقديم التلميحات المساعدة للطفل ، بحيث لا يتم تقديم الإجابة أو الاستجابة المطلوبة مباشرة ، بل يتم مساعدة الطفل على الوصول إلى الاستجابة المناسبة بتقديم تلميحات تنتقل بالطفل من درجة إلى أخرى ( من السهولة ) حتى يصل إلى الاستجابة المطلوبــــــــــــــــة .
كما يتم تعزيز البنية الثابتة باستخدام أعمال روتينية وأدوات مرئية مساعدة لا تعتمد على اللغة ، فالروتينات المتكررة تسمح له بتوقع الأحداث ، مما يساعد على زيادة التحكم في النفس والاعتمـــاد عليها ، فالتسلسل المعتاد للأحداث :
*        يوفر الانتظام وسهولة التوقع بالأحداث .
*        يساعد على إنشاء نسق ثابت لكثير من الأمور .
*        يوفر الاستقرار والبساطة .
*        يجعل الفرد ينتظر الأمور ويتوقعها ، الأمر الذي يساعد على زيادة الاستقلالية .

وهناك ثلاثة أنواع للروتينات :
أولاً : الروتينات المكانية : التي تعمل على ربط مواقع معينة بأنشطة معينة ، والتي يمكن أن تكون على شكل جدول مرئي تُستخدم كجدول يومي للأنشطة .
ثانياً : الروتينات الزمانية : التي تربط الوقت بالنشاط وتحدد بداية ونهاية النشاط بشكل مرئي وواضح .
ثالثاً : الروتينات الإرشادية : التي توضح بعض السلوكيات الاجتماعية والتواصلية المطلوبة .
وتعمل الأدوات المرئية المساعدة على إضافة بنية ثابتة للتدريس ، حيث إنها ثابتة زمنياً ومكانياً ويمكنها أن تعبر عن أنواع متعددة من المواد ، كالمواد المطبوعة ، والأشياء الحسية الملموسة ، والصور ، وعادة ما نفترض أن الكلمات المطبوعة تعتبر أصعب ، ولكن توضح الدكتورة كيل على أن هذا افتراض غير صحيح فالأدوات المرئية المساعدة :
1.       تساعد الطفل على التركيز على المعلومات .
2.      تعمل على تسهيل التنظيم والبنية الثابتة .
3.      توضح المعلومات وتبين الأمور المطلوبة .
4.      تساعد الطفل في عملية التفضيل بين أكثر من خيار .
5.       تقلل من الاعتماد على الكبار .
6.      تساعد على الاستقلال والاعتماد على النفس .
كما أن الأنشطة المرئية مثل تجميع قطع الألغاز puzzles ، وحروف الهجاء ، والطباعة ، والكتابة ، وقراءة الكتب ، واستخدام الكمبيوتر كلها تتميز بوجود بداية ونهاية واضحتين مما يساعد على وضوح تلك المهام .

مبادئ التفاعل الاجتماعي :
عند تدريس التفاعل الاجتماعي قم باستخدام  :
1.       سلسلة متوقعة من المواقف الاجتماعية .
2.      مجموعة معدة مسبقاً من المحادثات الشفهية المنتظمة .
3.      رسائل شفهية تتمشى مع النشاط الحالي .
4.      الاستخدام الآني للكلام والأدوات المرئية المساعدة .
5.       الوقفة كإستراتيجية من استراتيجيات التعلم ، أي توقف بين فترة وأخرى .
6.      المبالغة ( في إظهار العواطف مثلاً ... ) .
وباختصار فقد بينت الدكتورة كيل أنه من الضروري جداً تطابق طرق التدريس مع طرق التعلم الإدراكي الذهني والاجتماعي للشخص المصاب بالتوحد ، كما أن استخدام البنية الثابتة على شكل روتينيات وأدوات مرئية مساعدة يعمل على تعزيز التعلم عند هؤلاء الأطفال .

تحيتي ومودتي ... أيمن ... ؛